Sunday, 1 December 2013

Homemade winter chocolates


Sinterklaas (a Dutch tradition) and Christmas are almost here! Dutch stores are filled to the brim with chocolate letters, chocolate frogs and mice, chocolate Sinterklaasjes and all sorts of Christmas chocolates. These homemade chocolates are perfect for this most chocolatey month of the year. You can add any flavour you think would be tasty in combination with chocolate (turns out I find many things will go with chocolate, so I have made many different flavours, amongst which many classic combinations).


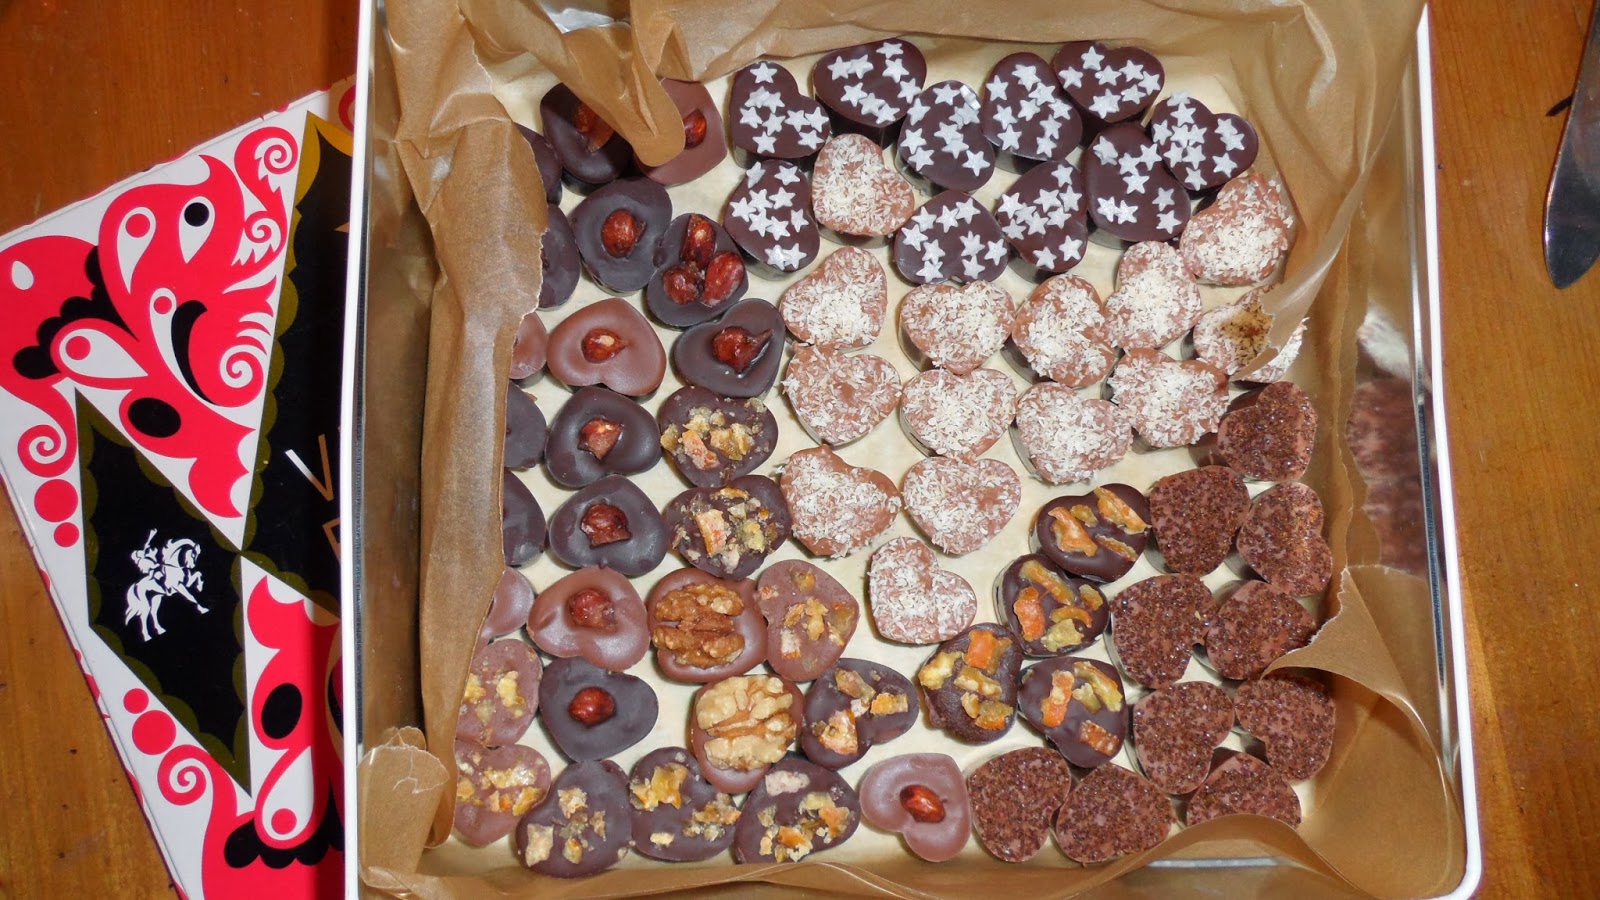
Chocolates in this picture:
 
- Glazed almond in dark chocolate and in milk chocolate
- Star chocolates with just milk chocolate (for those who love their milk chocolate plain and simple)
- Coconut chocolates with a creamy coconut core
- Glazed orange zest chocolates
- Cinnamon chocolates with a crispy sweet cinnamon core and brown sugar topping
- Walnut chocolates 


Chocolates in this picture:
 
- Glazed cherry chocolates
- Christmas chocolates with white and red chocolate and red Sugar
- Christmas chocolates with milk chocolate and red chocolate.
(- and two runaway star chocolates) 


 Chocolate making tips and tricks

You need:

- Good quality white, milk and dark chocolate. For the Christmas chocolates I have used red melting chocolate (for Dutch readers, you can buy red chocolate (and many other colours) in the Jumbo supermarkets €2,49).
- Chocolate molds. These heart shaped ones are from Flying Tiger (Tiger in other countries in which Tiger has not lost the name-lawsuit) and they cost €3.
- Fillings. You can use anything you find tasty in a chocolate. I have used glazed orange zest (this turns out to be quite easy to make, I'll explain how), walnut, glazed almonds (also smooth sailing when making it yourself), fudge, glazed cherries, coconut, cinnamon and chili powder (yes, I was intrigued by the chili chocolate in 'Chocolat', it wouldn't have crossed my mind, but now I know about it, it seems like a really good idea to combine hot chili with the sweet and smooth chocolate).
-  Toppings. I used silver stars (Jumbo, €1,79) and red Sugar (Action, €1,69) for the Christmas and star chocolates. For the rest of the chocolates I used the ingredients I put in the chocolates to make visible what flavour they are.

 
These  chocolates are fudge chocolates. I have filled them with chunky bits of fudge and sprinkled tiny fudge cubes on top.
 
 
These silver glittery stars have spruced up the plain milk chocolates and dark chocolates.
 
How to glaze fruit and nuts


These glazed cherries are store bought. However, it turns out to be quite easy to make your own glazed fruit and nuts.

This is what you need:

- Orange zest (try to avoid including the white part because it's bitter) and almonds.
- Sugar
- Water

To make glazed orange:
1) Boil the zest three times (this rids the orange zest of its bitter flavour). You can put your zest in a strainer and hang it in the boiling water. Throw away the water and bring to boil in the clean water twice.
2) Add some water to the zest and add a few tablespoons of sugar. Let the mixture simmer and stir until there is no more water left. You can spread your glazed orange zest on baking paper and let it cool. Make sure the sugar has no change to scorch.

When making glazed almonds you can follow the same steps as when making glazed orange zest, skipping the three times boiling step.

 
Filling


Most of the fillings for the chocolates are straightforward:

- Almond chocolates - fill the mold but leave a little room because the almond is quite bulky. Push the almond in the chocolate, leaving it to stick out a bit.

- Glazed orange chocolates - fill half of the mold with chocolate and add a few pieces of glazed orange zest. Fill with chocolate and top with the zest.

-  Cherry chocolates - same as the almond chocolates; push the cherry in the chocolates and leave it to stick out (it's so lovely and shiny and transparent).

- Walnut chocolates - put little chunks of walnut in the chocolate and top with half a walnut.

- Chili chocolates - add chili powder (and if you are in a brave and fearless mood, pieces of chili pepper) to your chocolate and top with little pieces of chili (I have avoided the infamous seeds) so you can recognize them. I would not want to be caught off guard by a chili chocolate.

- Fudge chocolates - put little chunks of fudge in the chocolates and top with tiny chunks of fudge.


There are a few ingredients that couldn't just be chucked into the chocolate:

- Coconut chocolates - I have added coconut flakes to the chocolate and also added a coconut core. The flakes in the chocolate and the core are roasted coconut flakes (roast for a few minutes in the oven at 175ºC). The core consists of the flakes, some white sugar (for crispness), brown sugar (for gooeyness) and some cream. Fill half the mold with the chocolate-coconut mixture, add the core and fill with the rest of the chocolate. Top with plain coconut flakes.

- Cinnamon chocolates - this chocolate is similar to the coconut chocolate. The core of the cinnamon chocolate exists of cinnamon, white sugar and brown sugar. Top with brown sugar and cinnamon.


 Thanks for taking a look! If you have any suggestions for fillings or toppings, I would love to hear them.


Sunday, 24 November 2013

Christmas tree pillow forest DIY

This little forest is a lovely and easy DIY project for Christmas. The pattern is really simple and making the trees is pretty straight forward as well, a good thing when you are planning on making a whole forest. You can use any kind of fabric you like and you can make the trees in every size.


You need:

- fabric in different patterns and if you like, in different colours
- brown felt for the trunks
- material to stuff your pillows
- if you like you can add sequins and beads to decorate your trees

When sewing the triangles, leave room in the centre at the bottom of the tree so you can stuff the pillow and add the trunk afterward.


Thanks a bunch for taking a look at the Christmas forest.


Thursday, 7 November 2013

BBC Sherlock Mug DIY

My favourite BBC series and my favourite Pinterest fandom have provided a wealth of beautiful images and lovely fan art. Inspired by these images I have been wanting to make Sherlock into something solid.


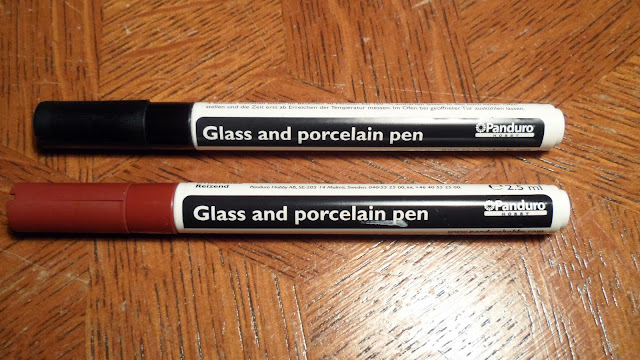
I thought the 'Just deduce it' was the best Sherlock Pinterest pin and a mug would be the perfect place for it. So I bought a black and a brown glass and porcelain pen and drew the text and the pipe on the plain white mugs. Easy as pie. They do still have to go in the oven for 90 minutes at 160°C. 


I love this DIY because, with only two colours needed, it is easy, inexpensive and lovely to draw.

Thanks again for taking a look!

Monday, 4 November 2013

About

Ella & Louis is a company/ label that I have dreamed about having for a large part of my life and that is finally coming into being. This blog will show the process of starting your own company and all the bumps in the road that leads to a thriving company (not thinking for a moment it won't get there).


ELLA EN LOUIS


I named the company after Ella Fitzgerald and Louis Armstrong, because to me, they symbolize a passion and a strength in making your dreams come true and working hard to achieve that. Music from different times and different cultures changes your way of thinking. To me, Ella and Louis inspire me to do my best to live my best life, choosing to do what I really want to do and putting energy and effort into that.

Just don't give up trying to do what you really want to do.
Where there is love and inspiration,
I don't think you can go wrong.

Ella Fitzgerald


THE TOTE BAG

The tote bag is a product I love, it is a fashion classic with endless possibilities. Tote bags will be the first line of products of Ella & Louis. I would love to create black totes with folk embroidery, totes made of vintage fabrics, hand-printed classic white totes and also a series of book totes. This series of book totes lies close to my heart. I have studied British Literature and I wanted to include my favourite books in my products. It's a way to keep them close.


The test Book Tote was a Virginia Woolf, Mrs. Dalloway Tote. I love this classic British novel, especially this quote. The quote represents a sense of Britishness, a sense of pride but also a certain darkness that I think are often present in British literature.

I know where I want this company to go, but the road there will be a long and bumpy one. I am really excited about all the possibilities it offers, and a bit scared as well having giving all this freedom to steer this ship. I will keep you posted!


Sunday, 27 October 2013

Sunday, 1 September 2013

DIY Book Tote - Mrs. Dalloway

For the Mrs. Dalloway Book Tote, I wanted to include both the Big Ben (because it is so closely linked to the book and because it is such a lovely image), and the beautiful Big Ben passage from Mrs. Dalloway as well.

For having lived in Westminster - how many years now? over twenty, - one feels even in the midst of the traffic, or waking at night, Clarissa was positive, a particular hush, or solemnity; an indescribable pause; a suspense (but that might be her heart, affected, that said, by influenza) before Big Ben strikes. There! Out it boomed. First a warning, musical; the the hour, irrevocable. The leaden circles dissolved in the air.
Virginia Woolf, 'Mrs. Dalloway'
 
 
It took up many many hours of embroidering because I wanted to embroider the Big Ben passage in handwriting. In hindsight, it may not have been such a good idea, but I do love how it turned out. And also, it feels special in a way to spend so much time embroidering a beautiful passage from a book you love.
 

Thanks so much for reading. What passages from books or songs would you like to embroider? I would love to hear your opinion.

Wednesday, 14 August 2013

DIY Ministry of Silly walks clock

I found this Monty Python clock on Pinterest and thought it was the best post. I was delighted when I found out there was a complete 'how-to-make' on the internet. Thank you so much Susanne for sharing how to make it. You can see Susanne´s tutorial on how to make your own Silly walks clock here.

If you do try to make it you won´t be disappointed. It was really easy and the result is great. I am chuffed to bits with my own silly walks clock.


Thanks so much for taking a peak at the silly walks clock.


Wednesday, 7 August 2013

You can knit a sweater by the fireside ...

Sunday mornings, go for a ride.

This was the first (and the last) post I wrote on my old literature blog. I found it so difficult to write about literature, about books, about songs, for I didn't want it to become a lecture, but I also didn't want it to be just my opinion. I decided that on this blog, I would give it another try, starting the new with the old.


The first literature post on this blog must start with instant literary happiness, of the kind that can only be brought by the Beatles. When I feel sad, for instance when I think about the chances of getting a job for graduates in the Netherlands (and in many places in Europe), I can put on a Beatles song and it seems as though for a moment, everything is much better. I will, in time, find a job in a library (just like the one Matilda visits in her Roald Dahl book) or a museum or a book store and work with kind colleagues, or perhaps be a writer, or start a bed and breakfast with a vegetable patch and chickens in the garden, or make a dream come true and start my own design shop, in which I can sell the things I make. I like thinking that way, and I believe the Beatles must have thought that way, for them being able to evolve and adapt so many different styles and moods. I'm not always able to think this way, sometimes a slight panic enters and I think, what am I doing with my life? Studying one of the subjects least likely to ever get you employed. No job, no house, no bed and breakfast, no shop. But then I listen to the Beatles and the panic goes (almost) as quickly as it came, and I think, yes, why shouldn't I be a paperback writer? And while at it, I will find a sweet husband and we will do the garden together, digging for weeds, as the chickens come looking for any worms that might come up.

When I get older losing my hair,
Many years from now,
Will you still be sending me a valentine
Birthday greetings bottle of wine?

If I'd been out till quarter to three
Would you lock the door,
Will you still need me, will you still feed me,
When I'm sixty-four?

oo oo oo oo oo oo oo oooo
You'll be older too, (ah ah ah ah ah)
And if you say the word,
I could stay with you.

I could be handy mending a fuse
When your lights have gone.
You can knit a sweater by the fireside
Sunday mornings go for a ride.

Doing the garden, digging the weeds,
Who could ask for more?
Will you still need me, will you still feed me,
When I'm sixty-four?

Every summer we can rent a cottage
In the Isle of Wight, if it's not too dear
We shall scrimp and save
Grandchildren on your knee
Vera, Chuck, and Dave

Send me a postcard, drop me a line,
Stating point of view.
Indicate precisely what you mean to say
Yours sincerely, Wasting Away.

Give me your answer, fill in a form
Be mine for evermore
Will you still need me, will you still feed me,
When I'm sixty-four?

If you happen to stumble into this post, please do leave your thoughts.

(Update: I have a job as a secretary now, for which I am very grateful, but I am still dreaming. This blog, however, is a good start).

Monday, 5 August 2013

Starting your own business

 JUST DO IT - STARTING YOUR OWN BUSINESS


I have been dreaming of my own Ella&Louis shop for a while now, thinking about what I would make, where I would make it, what materials I would need and how I would put the 'how-to-make' on the blog. Thinking being the operative word here, it never really seemed to develop beyond that stage. Inspired by other people who were/ are living dreams, such as Julia Child and Julie Powell (I watched Julie&Julia yet again) Garance Doré, Elsie Larson and Emma Chapman (a beautiful mess) and creativity deity Pharrell Williams, I felt I was a creativity/ living your dream nitwit, miles away from any Pharrellness. 'But Julia Child wasn't always Julia Child'. I simply had to start, just start and work hard and see where it goes. So I did, yesterday I contacted the 'Brouwmeesters', the people who have started a 'company-collective-building for the making industry' in Nijmegen, our lovely city. I am really excited about sharing a building with other creative people starting their own company and really hope this works out. It not working out is just not an option. I will keep you posted and hopefully I will acquire the tiniest bit of Pharrellness, so I can inspire others to take the plunge as well.

DOING IT!


Well done, the last post was over a year ago, so there was little 'just doing it' and more 'just postponing it'. However, Ella & Louis (or officially Jacoba Wilhelmina Maria, thanks to the Dutch chamber of commerce) is taking shape! The Smeltkroes is it's new home, a lovely and inspiring place, filled with creativity. I'm setting up house in room 10, the big, empty, sad middle part is mine:


On the first day of these 5 weeks off, I ordered my new Ikea table (yes, I can be proud of myself, ordering an Ikea table while sharing my room with a skilled cabinet maker). The truck driver couldn't find the Honig factory and when he did arrive, brought 4 table-legs and three iron things to attach them to the table, so I can start sewing as long as I mind the balance when placing things on the table (nonchalantly leaning on the table when talking to someone, not an option).


Well, the table is there (almost), my sewing machine is there, the Smeltkroes is a reality now. Even this first part of starting Ella & Louis/ JWM (looks kind of nice, they are my Christian names, the names of my grandmothers (and the virgin Mary, Catholic tradition being what it is), so maybe it will be a good thing, keeping the name) feels like a dream come true. I could feel it cycling back to the old part of the city after my first day in the Smeltkroes, a physical happiness, almost like your skin is tingling.

A dream come true it may be, a lot of work lies ahead. Last week was 4-daagse week, best week of the year in Nijmegen, so this week will be the week to get off to a running start. There are the practical things, such as deciding what to make first (I would really like to start with tote bags, love them, with folk embroidery), designing a logo (would love to have my own logo and embroider it on my tote bags), and investing time in making this visible online. Furthermore, there are more fundamental issues, such as constructing the identity of Ella & Louis/ JWM (maybe starting with deciding on the name), thinking about how to incorporate English literature (what I would really like to do) and creating the foundation for a strong label. It will be a long (and maybe bumpy) process, but I am convinced that it will work. I don't necessarily want to quote Ella Fitzgerald again, but it's intertwined with the start of everything:

Just don't give up trying to do what you really want to do. Where there's love and inspiration, I don't think you can go wrong.

Well, doing it, I suppose, trying it, which is exciting and a bit scary as well. 
I will keep you posted.

DESIGNING MY OWN LOGO

If you want to know about the delicate (really,it wasn't at all) process behind the design of my logo, click here.

Sunday, 4 August 2013

DIY Book Tote - Sherlock Holmes


This is the first tote bag in the series of the Book Totes project. Having studied literature, after graduating, I always wanted to do something more with the books I had read. Incorporating your favourite books in your DIY projects is a fun way to keep in touch.

Sherlock Holmes would have to be the first. Not only is it a classic tale, but Sherlock also has a great visual strength, with his characteristic hat and pipe. Furthermore, the wonderful BBC series Sherlock has driven me right into a Sherlock frenzy also strengthened my fascination with Sherlock Holmes.


I first cut out the front and the back of the tote in a fabric I thought would suit Sherlock. I made mine 48 by 40 cm because I wanted it to be big enough to fit everything when cycling around town.


The next step is to choose your image, draw the outline on the fabric and embroider with a basic stitch. Easy as pie! I like that the embroidery is simple but at the same time shows your handiwork.
Finally sew your tote together and add the handles.


 Enjoy your Book Tote! I am chuffed to bits that I can take my homemade bag to work (and can use it to carry my groceries on my way home in the evening as well).

Saturday, 3 August 2013

Vintage finds - Arcopal France

I'd like to share with you another world that harbours vintage treasure, named Arcopal. It's a twin of yesterday's post about JAJ Pyrex. Arcopal is even called the French Pyrex (probably not by the French). Once you delve deeper into this world of vintage tableware, many things appear to be either Pyrex or Arcopal. Look in your cupboard at home, you probably already own some Pyrex or Arcopal! I have found pictures on Pinterest (they are made by Nana Odile, thank you so much for doing this!) that show the Arcopal patterns, do you recognize any of them?


Today, I went to my favourite charity shop in an old school building in Ewijk. (When I was little and lived in Ewijk, my best friend went to that school). There is an oak cabinet in one of the classrooms and it is full of old casseroles. My best hopes on finding the beautiful Arcopal patterns to put on display in my future Etsy shop were in that cabinet. It didn't let me down, I have found some pretty pieces to add to the collection! It's so much fun to look up the patterns in the pattern-overview above.


You have probably seen this one in the charity shops, it's called 'Veronica' and has a pattern of little blue forget-me-nots, so pretty.


 This 'Fruits de France' pattern was well represented in the oak cabinet! I found a bowl, a stack of plates and a butter dish.


It's such a shame these patterns are listed under the 'unknown floral patterns'. Does anyone know what these patterns are called? Even if you're not sure, any help is welcome! I didn't even realize the last bowls, which were in our cupboard already, were Arcopal until I recognized the pattern in the pattern images, quelle surprise.

Thanks so much for reading!


Friday, 2 August 2013

Vintage finds - JAJ Pyrex

What better way to start the vintage finds posts than with JAJ Pyrex, the cherished British tableware with the wide range of colourful seventies patterns. J.A. Joblings started producing Pyrex tableware in Sunderland in 1922. With their heat resistant glass and beautiful patterns, Pyrex casseroles could go from the oven, straight on the dinner table. This caused for a huge success and Pyrex is still going strong today. Luckily, the Dutch charity shops are a goldmine when you want to scavenge for hidden Pyrex. This is the casserole loot, which shows some of the best known JAJ Pyrex patterns.


JAJ Pyrex patterns are known for their seventies colours and their fruit, vegetable and flower designs.
This flower pattern is called 'Indiana'.


This is one of the JAJ Pyrex vegetable patterns. What makes it special is the inclusion of the wine bottle and the wineglass, which make it a festive pattern. Not surprisingly, the pattern is called 'Fiesta'.


This pattern is a classic vegetable pattern. The design is simple and the colours are so pretty. The pattern is called 'Kent'.


 The last pattern is a pattern I find a bit unlike the other Pyrex patterns because of the finely detailed rose. It would be right at home amongst the French Arcopal vintage rose patterns. However, it is Pyrex and the pattern carries the beautiful name 'June Rose'.

I am planning on opening my very own Etsy shop to sell my vintage Pyrex finds. However, it is not ready to open yet, for the stock has to be Etsy worthy and consist of many vintage treasures and homemade items (like the Sgt. Pepper pepper mill I plan on posting soon!).

Thank you for reading.